Showing posts with label Snacks. Show all posts

Wednesday, August 7, 2013

Honey Jalapeno Cornbread


I have made cornbread many times and this one is by far my favorite. It's sweet and moist with just a bit of heat and flavor from the honey and jalapenos. I made collard greens and wanted some cornbread with them so I searched for jalapeno cornbread recipes since I had two leftover in my fridge.
I saw iowagirleats recipe on Pinterest and modified it. Thank you Iowa girl for the recipe. I loved it. She uses unsweetened apple sauce but I used regular apple sauce which is what I had. Therefore, I may reduce the sugar next time to be more savory and less sweet but it was delicious the way it was. I didn't have butter either so I used olive oil and it turned out just fine and moist. I plan to just use olive oil next time too. Also since I used regular apple sauce it was already sweet enough that we didn't need more honey to drizzle


Ingredients:
1/4 cup olive oil
1/4 cup applesauce
1/4 cup sugar (will reduce or omit this next time)
1/4 cup honey
2 jalapenos, seeded and diced
2 eggs, beaten
1 cup low-fat buttermilk ( I used 1 TBS lemon juice and fill up one cup with whole milk )
1 cup cornmeal
1 cup flour
1/2 teaspoon salt
1/2 teaspoon baking soda
Directions: 
  1. Preheat oven to 375 degrees. Spray an 8×8 or equivalent sized baking dish well with nonstick spray then set aside. In a large bowl, whisk together olive oil and applesauce. Add sugar and honey then whisk to combine.  Add eggs and buttermilk (or sour milk) then whisk to combine.
  2. In a separate bowl, stir together cornmeal, flour, salt, and baking soda. Whisk into dry ingredients in two batches. I took some batter out to make a mild version the added jalapeno to the rest of the batter.
  3. Pour mixture into prepared baking dish then bake for 30-35 minutes, or until a toothpick inserted into the center comes out clean.


 Below is a non spicy version in cute littles ramekins I made before I added jalapenos for my baby girl so it wont be too hot for her. She loved them. They were only in the oven for about 22 minutes since they were smaller and baked faster.


Friday, February 15, 2013

Marinated Cheese


Look how pretty and colorful this easy dish is! The name sounds interesting as well. This simple appetizer was introduced to me at a holiday party a few years ago and my friend was nice enough to share the recipe. This yummy recipe is a keeper for certain and I am sharing it with you for you and family or friends to enjoy!


Ingredients


1/2 cup olive oil

1/2 cup white wine vinegar

1 (2 ounce) bottle diced pimento, drained

3 tablespoons chopped fresh parsley

3 tablespoons minced green onions

3 cloves garlic, minced

1 teaspoon sugar

3/4 teaspoon dried basil

1/2 teaspoon salt

1/2 teaspoon ground black pepper

1 (8 ounce) package Cheddar cheese

1 (8 ounce) package cream cheese, cold

Directions

In a jar with a tight fitting lid, combine the olive oil, wine vinegar, pimento, parsley, green onion, garlic, sugar, basil, salt and pepper. Shake vigorously to blend. Set aside.

Cut the block of Cheddar cheese in half lengthwise. Cut crosswise into 1/4 inch slices to form squares. Repeat with cream cheese. Arrange cheese squares alternately in a shallow baking dish with slices standing on edge. You can arrange in a single long row, or 2 parallel rows depending on the size of your dish. Pour the marinade from the jar over the cheese slices, cover and refrigerate for at least 6 hours, or overnight.

To serve, remove slices to a serving platter so they are still arranged in an alternating pattern. Spoon some of the extra marinade over the cheese, and serve with crackers.


Friday, December 21, 2012

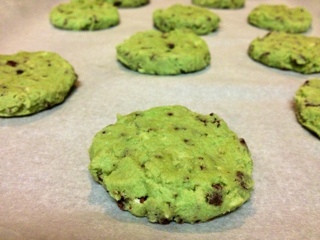
Mint Chocolate Cookies


Mint Chocolate Cookies

My hubby loves Andes mints and I was so excited when I saw Crafty c0rn3r's Mint Chocolate Cookies  on Pinterest. I rarely make cookies and I am not very good at making them but I gave it a try and they were a hit! There is room for me to improve of course…One thing I did wrong was that I mixed in the mint chips too soon instead of folding them in at last. So please be careful. Also, the cookies fell flat and turned out thinner than I would have liked so I will skip flattening the dough balls before baking next time. She used regular Andes mints and had her kids unwrap them and then chopped them. I was lucky and I got a bag of baking Andes mint chips at walmart.  Other than that, I followed crafty c0rn3r’s easy recipe! DELICIOUSLY MINTY!

Ingredients:

2 3/4 cup flour

1 tsp baking soda

1/2 tsp baking powder

1/2 tsp salt

1 cup unsalted butter (at room temperature)

1 1/2 cup sugar

1 egg

1 tsp mint extract

20 drops green food coloring

1 bag (10 oz) Andes baking mint chips

Directions

Preheat oven 375 degrees.

Sift the dry ingredients (flour, baking soda, baking powder and salt) together and set aside.

In a large bowl, cream together the butter and sugar until smooth. Beat in egg and mint extract.

Gradually blend in the dry ingredients. Add green food coloring and mix until even colored.

Lastly, fold in the Andes mint chips.


Use a cookie scoop or roll rounded teaspoonfuls of dough into balls using a spoon or your hands, and place onto ungreased cookie sheets.


Bake for 8-10 minutes. Let stand on cookie sheet for 2 minutes before moving them to wire racks to cool.


Saturday, September 3, 2011

Apple Walnut Gorgonzola Turnovers

I love gorgonzola cheese and was searching for recipes that use this cheese for a party. I found several recipes that sounded good but I chose to make these mini turnovers from simply recipe because I love the combination of apples, gorgonzola and honey. They turned out well and we enjoyed them. I will make this again and when I do, I will put a little more gorgonzola than the original recipe calls for. The combination of the sweetness of honey and apples, the crunchy walnuts and the cheese was AWESOME!


Recipe:

If using prepared frozen puff pastry sheets, they need to be defrosted in the refrigerator at least 3 hours before using.

Ingredients
* 1 1/2 cups peeled, cored, chopped apples (use a good cooking apple such as Jonagold, Pippin, Granny Smith, Jonathan, Golden Delicious, Gravenstein, Mcintosh)
* 1/2 cup chopped walnuts
* 1/4 cup crumbled gorgonzola cheese
* 2 teaspoons chopped fresh thyme leaves (or 1/2 teaspoon dried thyme, crumbled)
* 2 Tbsp honey
* 2 7-ounce prepared puff pastry sheets (total 14 ounces)
* 1 egg, beaten

Method

1 Place chopped apples in a bowl, microwave on high heat for 5 minutes until apples are cooked through. Remove from heat and let cool. Drain excess moisture. Once cooled, chop further so that the pieces are between 1/4-inch and 1/2-inch square. (Note you can skip this step if you want; the main purpose is to get the apples to release some of their moisture before cooking into the pastry.)

2 Combine apples, walnuts, gorgonzola, thyme and honey in a small bowl.


3 Preheat oven to 400°F. Working with one puff pastry sheet at a time (leave the second one in the refrigerator until using it) roll out the pastry to a size of 9-inches by 12-inches. Cut into 12 3x3-inch squares (a pizza slicer works great for this). Paint 1/2-inch of border around each square with beaten egg (this will help the pastry seal). Place a heaping teaspoon of the apple walnut mixture in the center of the squares. Fold over the squares into a triangle shape, stretching the dough if necessary to cover the filling. Use the tines of a fork to crimp the edges. Place triangles on a silpat or parchment paper lined baking sheet, with space between the triangles. Chill for 5 minutes in the refrigerator before baking, or chill while you prepare the second puff pastry sheet.

4 Whisk in a half teaspoon of water into the remaining beaten egg. Use a pastry brush to paint on the tops of the pastry triangles for a nice glaze. ( I sprinkled some sea salt on the top too). Place in oven and cook for 15-20 minutes until nicely puffed up and lightly browned. Allow to cool for at least 20 minutes before serving.

Makes 24 turnovers. Serve either warm or at room temperature. Can be made several hours in advance.

Friday, August 12, 2011

Irish Cream Brownies with Toffee Bits

Brownies are so easy to make and so yummy! Also, there are many little twists and varations you can create which makes them so FUN to make. I found an awesome recipe from allrecipe for these Irish Cream Brownies. I have been making these for almost every potluck or gatherings since. Hope you try these yummy little treats and enjoy them. I think they are very tasty!

Here is the recipe:

Yield 24 brownies


Ingredients

* 1 (20 ounce) package brownie mix
* 1/2 cup Irish cream liqueur
* 1/2 cup vegetable oil
* 2 eggs

* 2 teaspoons milk
* 2 tablespoons Irish cream liqueur
* 1 teaspoon brewed coffee
* 1/2 cup butter, softened
* 2 cups confectioners' sugar
* 1 teaspoon vanilla extract
* 1/2 cup toffee baking bits (such as Heath Bits 'O Brickle®) (optional)

Directions
1. Preheat oven to 350 degrees F (175 degrees C). Grease a 9x13 inch baking pan.
2. Stir together the brownie mix, the 1/2 cup Irish cream liqueur, vegetable oil, and eggs. Spread in the prepared pan.
3. Bake in the preheated oven until the top is dry and the edges have started to pull away from the sides of the pan, about 30 minutes. Remove from oven to cool completely on a wire rack.
4. Place the milk, 2 tablespoons Irish cream liqueur, and coffee in a small, microwave safe bowl. Microwave on High until the mixture boils. Set aside to cool completely.
5. Beat the butter and confectioners' sugar with an electric mixer in a bowl until smooth. Add the vanilla extract and the cooled Irish cream mixture, and beat well. Spread evenly over the cooled brownies. Sprinkle evenly with the toffee bits.

Nutritional Information

Amount Per Serving Calories: 276 | Total Fat: 14.2g | Cholesterol: 32mg

Tuesday, February 23, 2010

Amish Friendship Bread and the Endless Variations

Baking Amish Friendship Bread is a fun and yummy thing to start if you like to bake. You can do so many versions of it just by changing the flavor of the pudding you put in. I will warn you that you will be buying a lot more flour, sugar and milk than you ever did before and will be baking every 10 days if you continue. However, you can easily freeze your starter and it'll taste great once you thaw and start back from Day of of the starter cycle. Use this recipe if you want to make the starter or buy online or you may get it from a friend..hence the name Friendship bread :). I got mine from a friend. Once you have the starter bag, follow these easy instructions. and you will get the basic original cinnamon flavor bread...(although it's sweet and taste more like a muffin or loaf cake). Once you get tired of the basic recipe, try the variations. There are a million variations floating around on the Internet or you can use your imagination. Try it!!! I am having so much fun with it. great gift for neighbors or for holidays as well! Below are a few that I've tried and they are really GOOD!!!


Apple Cinnamon.

1 Chopped apple added to the original recipe.


Banana Nut.

Vanilla pudding is omitted from the original recipe.

Banana cream pudding, 2 frozen bananas meshed, half tsp nutmeg, 1/2 Cup chopped walnuts added instead.

Lemon Cranberry.

Add lemon pudding instead of vanilla.

Omit cinnamon, but add 1/2 cup crasins.


Chocolate.

Add Chocolate pudding instead of vanilla.

Omit cinnamon, but add 2 TBS coca powder. ( chocolate chips are optional)

Sunday, February 14, 2010

Valentine Chocolate Shortbread Cookies


Happy Valentine’s Day everyone! Today I made the shortbread cutest cookies that I've been wanting to make for a while. I am not a cookie person..Yeah call me crazy..I just like other deserts and cakes more than cookies. However, I do love chocolate and I do like shortbread cookies better than other cookies. So, I've been searching for a perfect recipe and this website gave me inspiration. if you ever visit that site, there are these cookies called the thong cookies...and they look hilarious. So it would be amusing to check it out if you have a minute. As I mentioned I am not a cookie person and I don't have many cookie cutters or cookie making supplies, so making these involved a little bit of improvising and you will see in the pictures below what I mean. The ingredients for the cookies are:

2 cups flour
1/4 cup cocoa powder
1/2 cup sugar
2 sticks butter
1 tsp vanilla

I melted some white chocolate chips to make them extra special too :) but it's optional only because the shortbread cookies taste pretty good and chocolaty enough by themselves.


Dry Ingredients. Flour and cocoa.


Wet Ingredients, butter and sugar.


Cream the butter and sugar using a mixer, then add vanilla.


Combie the dry and wet ingredients.


When you get this, stick this dough in the fridge for about 30 min.


I used a wine bottle to roll the dough out to about 1/4 inch thick. No cookie cutter? No problem!!! I just used a knife and free hand some hearts!


Viola! Heart shaped cookies ready to go in the oven, 375 degree for 10 min.


White chocolate chips being melted in a makeship double boiler..(Glass bowl on top of hot water in a sauce pan). I mentioned I improvised today ..I wasn't kidding. :)


Use this melted chocolate and decorate your cookies. (The fun part)


Ready for my Valentine(s)! My daughter is my biggest Valentine and she loved these. :)

Sunday, February 7, 2010

Chocolate Croissants


I joined the wonderful iheartcookingclubs. It is so much fun and they are friendly. They have a theme each week and they pick one chef and cook his/her recipes for 6 months. Members are free to pick the featured chefs recipes according to the theme. This weeks theme is Budgets and bargains and we are cooking with Niegella Lawson. So, I made something under $5.00 for breakfast. I got the recipe from here.
It was easy and good.